Backups Let You Sleep At Night!
The 3-2-1 Backup Rule: How I Sleep at Night with Duplicati and Zero Cloud Bills
Every server in my homelab backs itself up automatically, ships copies to a dedicated backup server, and pushes a weekly snapshot to Google Drive — all while I sleep. If my house burns down tomorrow, I lose nothing.
This isn’t enterprise gear. It’s Duplicati, some n8n workflows, and a backup server built from spare parts. Total recurring cost: $0.
I’m going to walk you through the whole thing — the strategy, the setup, the monitoring, and the mistakes I made building it. By the end, you’ll have a backup system that would make a sysadmin weep with joy.
Sequel alert: This builds on my n8n articles. n8n: A Homelab Superpower covers the automation platform, and n8n Backs Up n8n covers the workflow backup system that feeds into this one. You don’t need them for this article, but they fill in the backstory.
$ ./quick_start.sh — Already know 3-2-1? Just want the Duplicati Docker setup?
Quick Start: 10 Minutes to Backups
Prerequisites: A Linux host with Docker, and something worth backing up.
- Generate your settings encryption key:
openssl rand -hex 32 - Create your directories:
mkdir -p /opt/duplicati/config - Use the Docker Compose file from the Setup section below (update hostnames and paths)
docker compose up -d- Hit
http://your-server:8200, configure your first backup job - Add webhook monitoring to catch failures (see Monitoring section)
- Download the staleness monitor workflow for n8n
That’s the skeleton. Read the rest for the full strategy, the war stories, and the monitoring setup that ties it all together.
$ cat /etc/backup-philosophy.conf
The 3-2-1 Rule (And Why Most Homelabbers Get It Wrong)
The 3-2-1 rule is simple:
- 3 copies of your data
- 2 different storage media (or locations)
- 1 copy off-site
That’s it. The gold standard of data protection, older than “the cloud.”
But here’s where most homelabbers mess up: they hear “3-2-1” and think they need to backup everything to everywhere. Every Docker volume, every log file, every config — all mirrored to three locations.
That’s not a backup strategy. That’s hoarding with extra steps.
What Actually Needs Backing Up
Here’s the uncomfortable truth: most of what’s running in your homelab can be rebuilt from scratch in an afternoon. Docker containers? Pull the image again. Linux configs? Ansible playbook. The OS itself? Reinstall.
What you can’t recreate:
- Databases — your actual data (Postgres, MySQL, SQLite files)
- Configuration that took hours to get right — automation workflows, dashboards, complex docker-compose files
- Media and personal files — photos, documents, anything irreplaceable
- Certificates and secrets — if you lose these, things break in ugly ways
Everything else? That’s what documentation and Infrastructure as Code are for.
$ tree ~/backup-system/
The Architecture
Here’s how my 3-2-1 actually looks:
Docker services (App-Server, Monitoring-Server, Desktop)
|
v
Automated backup scripts (nightly, staggered)
|
v
/opt/backups/*.tar.gz (Copy #1 -- local compressed archives)
|
+-----> Duplicati (daily) -----> Backup-Server (Copy #2 -- 8TB dedicated box)
|
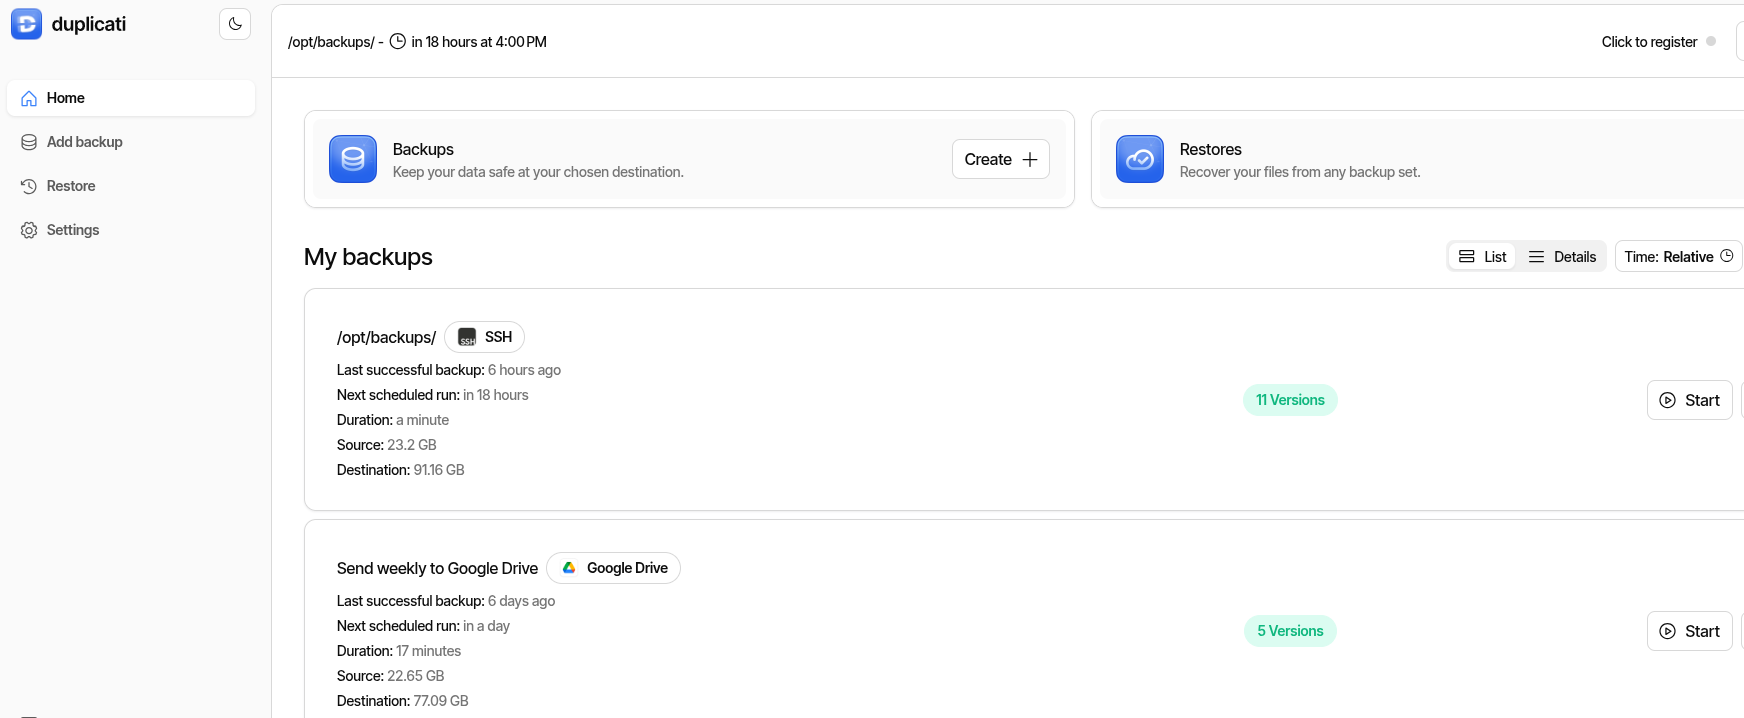
+-----> Duplicati (weekly) ----> Google Drive (Copy #3 -- off-site DR)Three Docker hosts create their own local backups every night using n8n — databases, configs, app data. Duplicati picks up those archives and ships them to a dedicated backup server over SFTP, plus a weekly push to Google Drive for off-site disaster recovery.
rm -rf, a ransomware infection, or a dead drive takes your data and your backups in one shot. The backup server is a separate physical box — different hardware, different failure domain.
What’s in my backup chain (the specifics)
For the curious, here’s what my nightly automation orchestrates:
Postgres databases compressed to .sql.gz — the crown jewels. Actual user data that can’t be recreated.
// Daily, 7-day retention. Old dumps auto-deleted.
Every n8n workflow exported as individual JSON files with timestamped directories. Hours of work in each one.
// Daily, 30-day retention. These change constantly during development.
Grafana dashboards, Prometheus TSDB, Loki chunks, Uptime Kuma SQLite — all tarred and compressed.
// Daily, 7-day retention. The Grafana permission bug lives here (see Lessons Learned).
Full app directories for services that don’t change often. Weekly is plenty.
// Weekly (Sunday). Scheduled for lowest-traffic window.
Each backup runs as its own independent workflow — if one fails, the others still complete. The whole chain finishes before 3 AM, when Duplicati picks up and ships everything off-box.
$ man duplicati
Why Duplicati?
I evaluated several backup tools before settling on Duplicati. The short version: it was the only one that checked every box without bolting on extra tools.
- Web UI — configure and monitor from a browser. No CLI-only config files.
- Block-level deduplication — only uploads changed blocks, not entire files. A 140MB backup deduplicates to a few megabytes of delta most days.
- Client-side AES-256 encryption — your cloud provider can’t read your backups. Period.
- Native Google Drive support — no rclone wrapper needed. OAuth flow built into the UI.
- Built-in scheduling — no cron jobs to maintain separately.
- Docker image available — LinuxServer.io maintains a solid image.
How does Duplicati compare to Restic and BorgBackup?
All three are excellent. Here’s why I picked Duplicati:
| Feature | Duplicati | Restic | BorgBackup |
|---|---|---|---|
| Web UI | Yes (built-in) | No | No |
| Block-level dedup | Yes | Yes | Yes |
| Client-side encryption | AES-256 | Yes | Yes |
| Google Drive native | Yes | Via rclone | Via rclone |
| SFTP support | Yes | Yes | Yes |
| Scheduling built-in | Yes | No (needs cron) | No (needs cron) |
| Docker image | Yes (linuxserver) | Yes | Yes |
| Learning curve | Low | Medium | Medium |
If you’re comfortable with CLI-only tools and already use rclone, Restic is fantastic. BorgBackup is rock-solid for local/SSH backups. Duplicati won for me because I wanted a web UI and native cloud support without extra moving parts.
$ docker compose up -d duplicati
Setting Up Duplicati
Getting Duplicati running takes about 10 minutes. I run it as a Docker container on my servers, but it also installs natively on Linux, Windows, and macOS.
The key things to get right:
Critical Setup Notes
- Generate your settings encryption key —
openssl rand -hex 32. Newer LinuxServer images won’t start without it. - Get your hostname allowlist right — use
--allowed-hostnames, NOT--webservice-allowed-hostnames(ask me how I know). - Mount backup source as read-only — Duplicati only needs to read. Use
:roon the volume mount. - Container paths, not host paths — if you mount
/opt/backupsto/source/backups, browse to/source/backupsin the UI.
Docker Compose file for Duplicati
services:
  duplicati:
    image: lscr.io/linuxserver/duplicati:latest
    container_name: duplicati
    environment:
      - PUID=0
      - PGID=0
      - TZ=America/Chicago
      - SETTINGS_ENCRYPTION_KEY=<your-key-from-openssl-rand-hex-32>
      - CLI_ARGS=--webservice-interface=any --webservice-port=8200 --allowed-hostnames=your-hostname,your-hostname.local,your-ip,localhost
    volumes:
      - /opt/duplicati/config:/config
      - /opt/backups:/source/backups:ro
    ports:
      - "8200:8200"
    restart: unless-stopped
Adjust TZ, hostnames, and volume paths for your environment. The :ro on the source mount is intentional — Duplicati only reads.
Configuring your first backup job
Once the container is up, hit http://your-server:8200:
- Add backup — name it descriptively (e.g., “Docker-1 Daily to Backup-Server”)
- Set encryption passphrase — strong, unique per job. Store it in your password manager. You will need this to restore.
- Destination — SFTP to your backup server, or Google Drive (Duplicati handles the OAuth flow in the UI)
- Source —
/source/backups/(the mounted volume, not the host path) - Schedule — daily, timed after your local backup scripts finish
- Retention — smart retention or keep-last-N, depending on how far back you want to go
For Google Drive: click “AuthID” in the destination config, log in with your Google account, and Duplicati handles the rest. No API keys, no service accounts, no rclone.
$ tail -f /var/log/backup-monitor.log
Monitoring (Because Backups You Don’t Verify Are Worthless)
Here’s the thing nobody tells you about backups: a backup that silently fails is worse than no backup at all. At least with no backup, you know you’re unprotected. A silently failing backup gives you false confidence.
I built three layers of monitoring with n8n:
Every Duplicati job sends a webhook after completion. An n8n workflow catches it, checks the result, and if it’s anything other than “Success” — instant push notification and email.
What if a backup doesn’t fail… it just doesn’t run? The staleness monitor checks every 12 hours. If any job hasn’t reported in longer than its threshold, it alerts. And it keeps nagging every 12 hours until you fix it. That’s by design.
Every Sunday morning, I get an email with every backup job’s success rate, data uploaded, and last run date. This is my “everything is fine” confirmation. If I don’t get it, something’s wrong with n8n itself.
How to set up Duplicati webhook monitoring
Add these advanced options to each Duplicati backup job:
--send-http-url=https://your-n8n-instance/webhook/duplicati-backup
--send-http-result-output-format=Json
--send-http-verb=POST
Duplicati will POST a JSON payload after every backup run. The key field is ParsedResult — it’ll be "Success", "Warning", or "Error".
Your n8n workflow needs:
- A Webhook trigger node to receive the POST
- An IF node checking whether
ParsedResultequals “Success” - Notification nodes on the failure path (email, Pushinator, Slack — whatever you use)
- Optionally, a Code node to log the result to a JSONL file for the staleness monitor to read
The downloadable staleness monitor workflow handles Layer 2. It reads the log of webhook receipts and checks when each backup job last reported in. Default threshold: 36 hours for daily jobs, 8 days for weekly jobs.
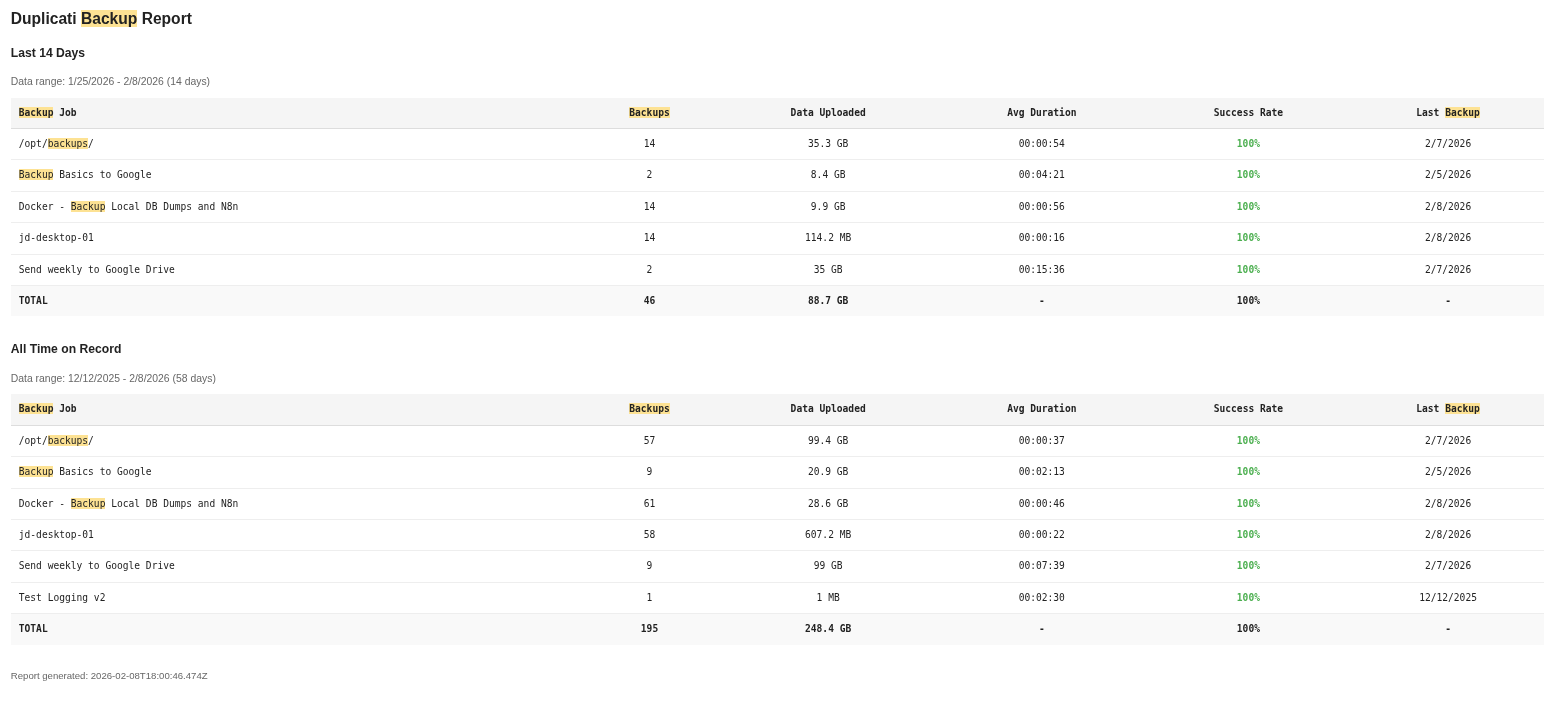
Sample weekly report format
Backup Job       | Backups | Data Uploaded | Avg Duration | Success | Last Backup
-----------------------------------------------------------------------
Desktop-1        |    11   |    1.2 GB     |   00:08:45   |   91%   | 02/12/2026
Docker-1         |    11   |    245 MB     |   00:03:22   |  100%   | 02/12/2026
Docker-2         |    11   |    128 MB     |   00:02:15   |  100%   | 02/12/2026
Color-coded in the actual email: green ≥ 90%, yellow ≥ 70%, red < 70%. One glance tells you everything.
$ cat /var/log/mistakes.log
Lessons Learned (The Hard Way)
Every one of these cost me at least an hour. Save yourself the trouble.
Client Permissions: The 1.3KB Grafana Backup
During a backup audit, I discovered my Grafana backup was 1.3KB. The actual data directory is about 20MB.
The problem? Grafana’s data directory is owned by UID 472 (the container’s internal user). My backup script was running as a regular user who couldn’t read those files. The tar command silently succeeded with zero files inside.
The fix: Run backup scripts as root. Principle of least privilege is great, but your backup user needs to actually read what it’s backing up.
The lesson: Always verify your backups contain what you think they contain. A backup that completes “successfully” but contains nothing useful is the cruelest failure mode.
Lost in Flags: The –allowed-hostnames Trap
Spun up Duplicati, navigated to the web UI, and got… infinite “Connecting…” spinner. The CLI flag is --allowed-hostnames, NOT --webservice-allowed-hostnames. The wrong flag name silently does nothing. No error, no warning.
The lesson: When a service silently fails to configure, check the exact parameter name. “Close enough” doesn’t count in CLI flags.
A Newer Requirement: The Settings Encryption Key
Pulled the latest Duplicati Docker image, started the container, immediate exit. Buried in the logs:
Missing encryption key, unable to encrypt your settings database
Please set a value for SETTINGS_ENCRYPTION_KEY and recreate the container
This is a newer requirement. Older images didn’t need it. If you’re upgrading or following an older tutorial, you’ll hit this wall.
The fix: openssl rand -hex 32 and add it to your docker-compose environment.
UI vs. CLI: The Password Reset Loop
Set the Duplicati web UI password via --webservice-password=xxx in CLI_ARGS. Worked great. Restarted the container. Password reverted to the CLI_ARGS value, overriding what I’d set in the UI.
The fix: Don’t set the password in CLI_ARGS. Set it through the UI and let it persist in the config volume.
Docker’s Hidden Data: The Volume Discovery
The same audit that caught the Grafana issue revealed that two monitoring services had their data in Docker volumes, not bind mounts. The backup scripts (targeting /opt/ paths) were backing up empty directories. Successfully. Every single night. For weeks.
The fix: Migrated to bind mounts so data lives at predictable filesystem paths.
The lesson: Docker volumes are convenient, but they’re invisible to host-level backup tools. If you’re backing up from the host, use bind mounts.
Every Backup Needs a Verify
The theme of this entire section is the same: backups that aren’t verified are just wasted disk space. I had three separate issues — wrong permissions, Docker volumes, and an empty directory — all running “successfully” for weeks before I caught them.
Now I run a quarterly audit: pick a random backup, restore it to a temp directory, check the file sizes, spot-check the contents. Takes 15 minutes. Worth every second.
$ cat /var/billing/monthly-invoice.txt
The Cost
| Component | Monthly Cost |
|---|---|
| Duplicati (open source) | $0 |
| n8n (self-hosted, community edition) | $0 |
| Backup server (spare hardware, already owned) | $0 (electricity only) |
| Google Drive (15GB free tier) | $0 |
| Monitoring & alerts | $0 |
| Total | $0/month |
The only real cost is electricity and the afternoon it takes to set up. If you don’t have spare hardware for a dedicated backup server, a used Dell Optiplex on eBay runs $50–100 and will do the job.
Google Drive’s free 15GB is more than enough for compressed, deduplicated config and database backups. If you need more, Google One starts at $3/month for 100GB, or look at Backblaze B2 (~$0.005/GB/month).
$ cp -r /opt/backup-template ~/my-setup/
Make It Yours
You don’t need my exact setup. Here’s the minimum viable 3-2-1:
- Pick your backup tool — Duplicati, Restic, BorgBackup, even rsync + cron
- Identify what actually matters — databases, configs, irreplaceable files
- Automate local backups — cron, systemd timers, n8n, whatever works
- Ship copies to a second location — another machine, a NAS, an external drive
- Push something off-site — Google Drive, Backblaze B2, a friend’s NAS over WireGuard
- Verify your backups — actually restore one. Check the file sizes. Make it a habit.
The specifics matter less than the discipline. Any 3-2-1 is better than no 3-2-1.
$ wget staleness-monitor.json
Download: Backup Staleness Monitor
This is the n8n workflow that powers Layer 2 — the staleness detection that catches backups that silently stop running. All credential IDs, email addresses, and instance-specific details have been replaced with placeholders.
After importing into n8n:
- Update the SSH credential on the “Read Backup Log” node to point at your n8n host
- Update the Pushinator credential and channel ID (or swap for your preferred notification tool)
- Update the Gmail credential and email address on the alert node
- Adjust the staleness thresholds in the Code node for your backup schedule
- Configure your Duplicati jobs to send webhooks (see the Monitoring section above)
- Toggle the workflow to Active
$ exit
Wrapping Up
Backups are the most boring, most important thing you’ll ever set up in your homelab. Nobody’s going to compliment your backup system at a dinner party. But the day something goes wrong — and something will go wrong — you’ll be glad you spent the afternoon.
My system runs every night, monitors itself, and yells at me if anything breaks. It cost nothing but time to build. The peace of mind is worth every minute.
Now go back up your stuff.