The #1 DNS Mistake That Will Crash Your Homelab (and How to Fix It for Free)
If you’re running a homelab, you’ve probably spent countless hours tweaking services and perfecting your dashboard. But you might be making one of the most common—and disruptive—mistakes possible: relying on a single DNS server.
Or, perhaps you’re a step ahead. You’ve configured two DNS servers in your clients’ network settings, thinking you’re safe. But then, one of those servers goes down, and your entire network grinds to a halt. Web pages take forever to load and services become unreachable.
This happens because DNS is a Tier 1 critical service. The sad truth is that most operating systems handle DNS failover horribly, stubbornly waiting for a primary server to time out instead of instantly switching to a secondary.
But what if you could build an enterprise-grade, fully automated failover system that makes DNS outages a thing of the past? I’ve been relying on this exact configuration in my own homelab for years, and the result is… it just works. No headaches, no downtime. And the best part is, you can do it for free.
The solution is a Virtual IP Address (VIP) managed by keepalived, and this guide will show you exactly how to set it up on Ubuntu.
The Architecture: A Floating IP for Your DNS
What is a Virtual IP (VIP)?
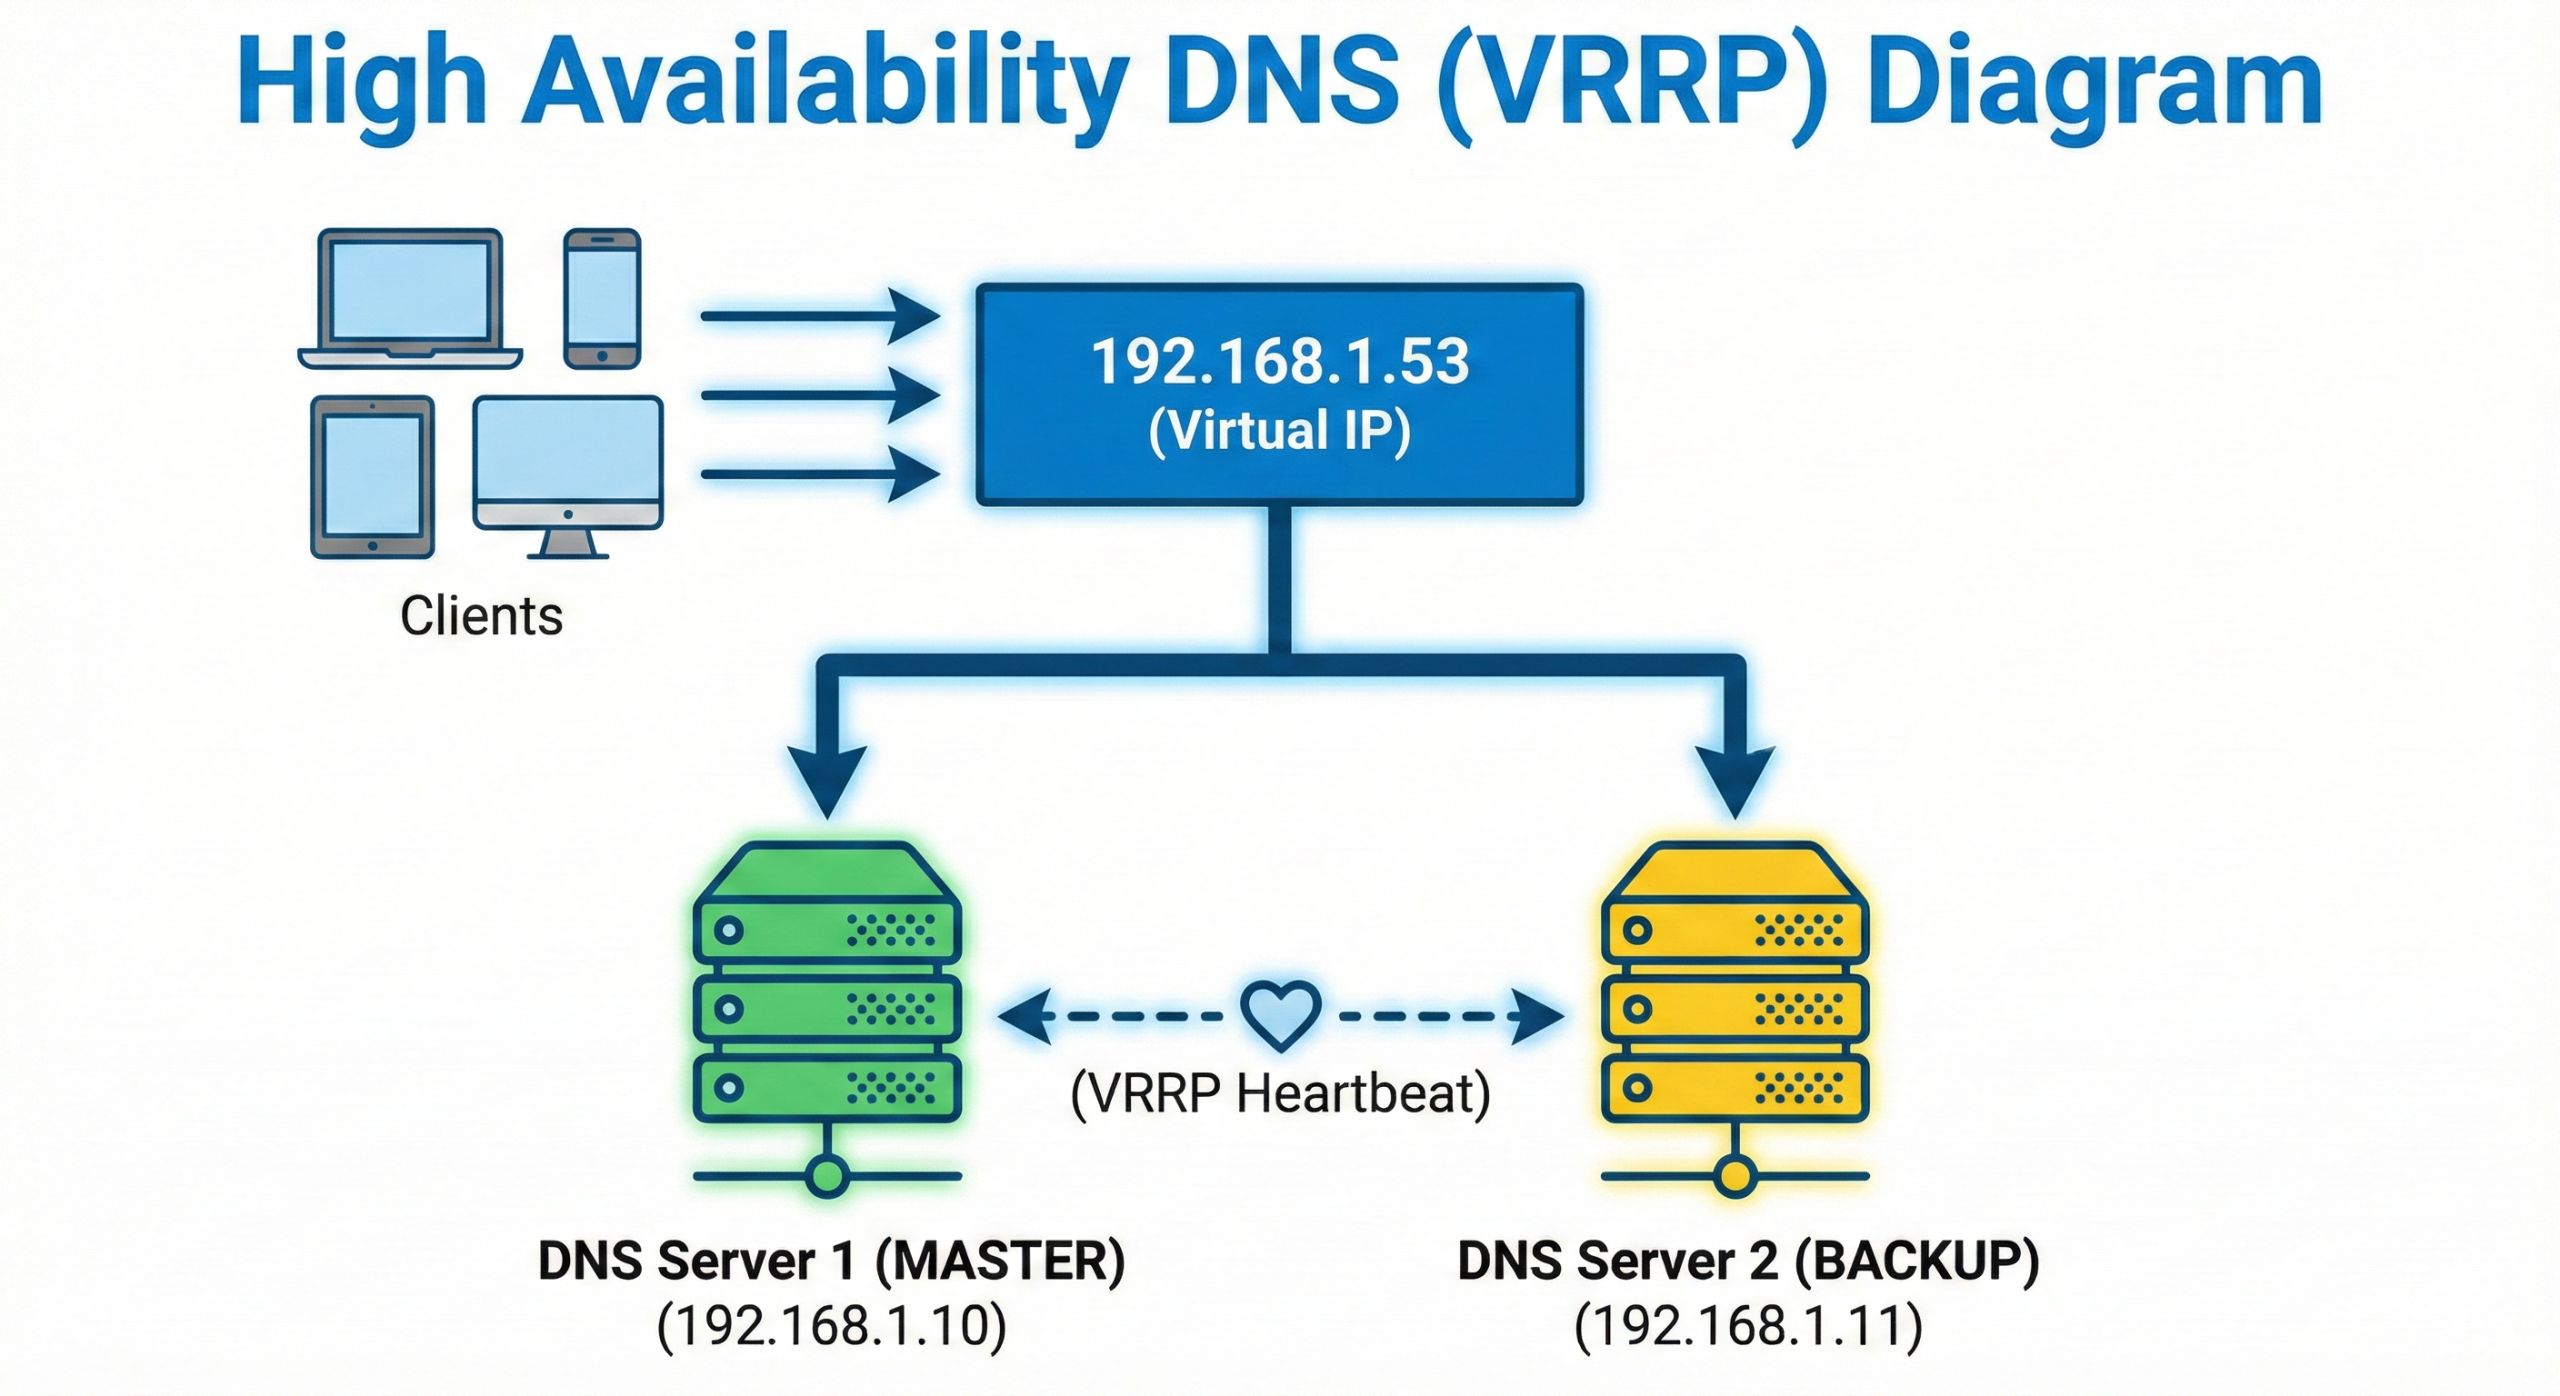
A VIP is an IP address that isn’t tied to a specific physical machine’s network card. Instead, it’s a “floating” address that software can programmatically assign to an active server. Thekeepalivedservice on each server communicates with its peers. The “healthiest” server (the MASTER) tells the network, “I am the owner of the VIP right now!” If that server fails, the BACKUP server takes over and announces that it now owns the VIP. Clients never need to change their configuration because the IP address they are pointing to never changes.
Instead of relying on clients, we take control on the server-side. Here’s the visual:
How keepalived Works: The Magic of VRRP
keepalived is simple, lightweight, and incredibly effective. It uses the Virtual Router Redundancy Protocol (VRRP), a standard method for creating high-availability networks.
- Roles: One server is elected
MASTER, and the other becomes aBACKUP. - Priority: The election is decided by
priority. The server with the highest number wins and becomes theMASTER. - Advertisements: The
MASTERserver continuously sends out tiny network packets (VRRP advertisements) saying, “I’m alive and I own the VIP!” TheBACKUPserver listens for these. If it stops hearing them for a few seconds, it assumes theMASTERis down and takes over the VIP, promoting itself toMASTER. - Health Checks: Our
check_dns.shscript makes this even smarter. If the script fails on theMASTER,keepalivedtemporarily lowers its own priority. This causes theBACKUPserver (which now has the higher priority) to win the election and take over the VIP, initiating a failover even if the server itself hasn’t crashed.
It’s a simple and robust system that has been a networking staple for decades.
Prerequisites
- Two servers running Ubuntu (e.g., 22.04) with a DNS service already configured.
sudoaccess on both servers.- Static IP addresses configured on both servers.
Our Example Setup:
- DNS Server 1 (Primary):
192.168.1.10 - DNS Server 2 (Backup):
192.168.1.11 - Virtual IP (VIP):
192.168.1.53
Step-by-Step Guide
Step 1: Install Keepalived
On both of your DNS servers, install the keepalived package.
sudo apt update
sudo apt install keepalived -y
Step 2: Create a Health Check Script
On both servers, create the script at /etc/keepalived/check_dns.sh. This is better than just checking if a process is running because it verifies the DNS service is actually responding.
sudo nano /etc/keepalived/check_dns.shPaste in the following content:
#!/bin/bash
# /etc/keepalived/check_dns.sh
/usr/bin/dig @127.0.0.1 google.com > /dev/null 2>&1
if [ $? -eq 0 ]; then
    exit 0
else
    exit 1
fi
Make the script executable on both servers:
sudo chmod +x /etc/keepalived/check_dns.shStep 3: Configure the Primary (MASTER) Server
On your primary DNS server (192.168.1.10), edit the configuration file:
sudo nano /etc/keepalived/keepalived.confDelete the existing content and replace it with this:
# /etc/keepalived/keepalived.conf on MASTER (192.168.1.10)
global_defs {
   router_id DNS_MASTER
}
vrrp_script chk_dns_service {
    script "/etc/keepalived/check_dns.sh"
    interval 2
    fall 2
    rise 2
}
vrrp_instance VI_DNS {
    state MASTER
    interface ens18         # ** IMPORTANT: Change to your network interface name **
    virtual_router_id 53
    priority 150
    authentication {
        auth_type PASS
        auth_pass your_secret_password
    }
    virtual_ipaddress {
        192.168.1.53/24
    }
    track_script {
        chk_dns_service
    }
}
Step 4: Configure the Secondary (BACKUP) Server
On your secondary DNS server (192.168.1.11), do the same. The only changes are router_id, state, and a lower priority.
# /etc/keepalived/keepalived.conf on BACKUP (192.168.1.11)
global_defs {
   router_id DNS_BACKUP
}
vrrp_script chk_dns_service {
    script "/etc/keepalived/check_dns.sh"
    interval 2
    fall 2
    rise 2
}
vrrp_instance VI_DNS {
    state BACKUP
    interface ens18         # ** IMPORTANT: Change to your network interface name **
    virtual_router_id 53
    priority 100
    authentication {
        auth_type PASS
        auth_pass your_secret_password
    }
    virtual_ipaddress {
        192.168.1.53/24
    }
    track_script {
        chk_dns_service
    }
}
Step 5: Start and Enable the Services
On both servers, start the keepalived service and enable it to launch on boot.
sudo systemctl enable --now keepalivedStep 6: Verify the Setup
Run ip addr show on both servers. You should see the VIP 192.168.1.53 listed on the MASTER server, and it should not be present on the BACKUP server.
To test the failover, stop the keepalived service on the MASTER:
sudo systemctl stop keepalivedNow, re-run ip addr show on the BACKUP server. Within seconds, the 192.168.1.53 IP address will appear! Start the service again on the MASTER to have it reclaim the VIP.
Step 7: Update Your Network’s DHCP Settings
The final step is to update your network’s DHCP server (likely on your router) to hand out the new DNS VIP (192.168.1.53) as the one and only DNS server for your clients.
Troubleshooting and Management
- Where is the VIP now?
Runip addr showon both servers and look for the VIP.ip addr show | grep 192.168.1.53 - How do I check the cluster status?
Thekeepalivedlogs will tell you about state changes (e.g., MASTER to BACKUP).sudo journalctl -u keepalived.service -f - How do I manually force a failover?
To perform maintenance on your MASTER server, simply stop thekeepalivedservice on it. The BACKUP will take over the VIP automatically.# On the current MASTER server sudo systemctl stop keepalived - Where are the configuration files?
keepalivedconfig:/etc/keepalived/keepalived.conf- Health check script:
/etc/keepalived/check_dns.sh
Security Warning: For Homelab Use Only!
This keepalived configuration is fantastic for a homelab, but it is NOT for production business environments. The VRRP protocol does not use cryptographically secure authentication. A malicious actor on your local network could potentially interfere with the cluster. This is safe in a typical homelab because you trust the devices on your LAN.
What’s Next: Production-Ready Security Hardening
That security warning is important, but it’s not the end of the story. We believe in providing complete solutions, and the next evolution of this guide will address these security concerns directly, elevating this setup from a “homelab trick” to a robust, secure, and production-ready foundation.
We are currently testing and documenting the following enhancements. This article will be updated once the process is finalized and proven to be stable, because we never recommend a solution without testing it first.
The Plan: UFW and WireGuard
-
Phase 1: Firewall Segmentation with UFW
We will use UFW (Uncomplicated Firewall) on both DNS servers to lock down all ports. The rules will only permit traffic that is absolutely necessary:- Allow DNS queries from your local network clients.
- Allow SSH access from a trusted management IP or subnet.
- Critically, we will restrict the VRRP heartbeat traffic so that it is only accepted when it comes from the other DNS node. This prevents a rogue device on the network from interfering with the cluster.
-
Phase 2: Encrypting the Control Plane with WireGuard
To completely secure the VRRP communication, we will create a private, encrypted WireGuard tunnel between the two DNS servers.keepalivedwill be reconfigured to send all its heartbeat and control traffic through this secure tunnel, instead of over the open LAN.- This makes the entire high-availability mechanism invisible and inaccessible to anyone else on the network, effectively nullifying the security warning above.
Stay tuned for the update! By adding these layers, we will create a truly enterprise-grade HA DNS system that is not only resilient but also secure.
A Resilient Homelab, for Free
You have now built a resilient, enterprise-grade DNS foundation for your homelab using nothing but free, open-source software. No longer will a single server crash or a botched update bring your entire network to its knees. This is the power of taking control of your infrastructure.